All product image guides Resale clothing measurement photos

Make the measurement's method visible.

A tagged size and a photographed flat width describe different things. For resale clothing, show the actual garment, identify the measuring points and units, and keep your written numbers connected to photographs of that same item.

Explore a separate scene from your garment photo Two free credits when you sign up. Review the result before publishing.
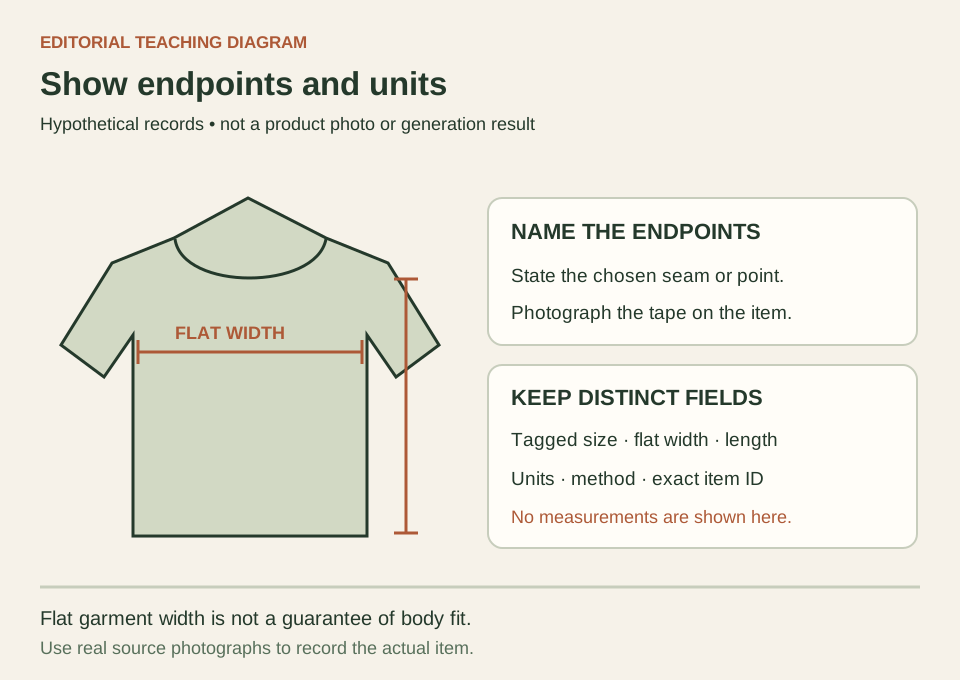
Teaching diagram of a fictional flat shirt with chest-width and length endpoints and an instruction to record units
EDITORIAL CONCEPT
01 / EXAMPLEILLUSTRATIVE CONCEPT
What this shows

Endpoints matter as much as the number.

The diagram separates a flat chest width from a length measurement. It provides no measured values. Use a tape on the real garment and keep both endpoints visible in your factual photos before recording a number in the listing.

Teaching diagram of a fictional flat shirt with chest-width and length endpoints and an instruction to record units
Editorial conceptOriginal teaching diagram, not a product photograph, Fayvoro generation or customer result. Arrows are schematic. No numerical measurement, garment dimension or body-size recommendation is being asserted.

This image is an editorial concept made for the site. It is not a Fayvoro generation or customer result. AI can change product shape, color, packaging, labels, and text. Check every important detail against the real item.

02 / A PRACTICAL WORKFLOWSTART WITH YOUR PHOTO
01

Record tagged size and actual measurements separately

Assign the garment an inventory identifier, photograph its size and care labels where readable, and write down its current sale condition. Then choose measurements that answer the buyer's likely question: chest width and length for a top, waist and inseam for trousers, or another clearly described garment-specific dimension. Keep the tagged size as a label fact rather than quietly changing it to match your interpretation of the measured width.

eBay's sizing guidance asks sellers to choose the supported size that best represents the item and add tagged-size, fit and measurement details when needed. Its examples include chest, length, waist and inseam. That is platform guidance, not a universal conversion chart. A measured width does not prove how the garment fits a particular person; fabric, cut, intended ease and the buyer's own comparison garment all matter.

  • Keep label size, flat measurements and any fit notes in distinct fields.
  • Use the same inventory ID for the tape photos, labels and garment overview.

Plan hat product photographs — Plan hat product photos with readable crown shape, brim profile, adjustment and interior size label. Keep styled scenes separate from real fit evidence.

02

Photograph the tape and the measuring points

Lay the actual garment on a surface large enough for the relevant section, without stretching it to reach a desired number. Smooth distracting folds gently and choose one repeatable orientation. Place the tape so the starting point, endpoint and unit marks are visible. Take an overview that identifies the garment, then a closer measurement frame if the reading is too small. Do not photograph only a floating numeral without its context.

For each dimension, record the method alongside the result: flat chest width across the chosen points, back length from a named seam, or inseam between specified endpoints. A single flat width is not automatically a body circumference or a guarantee of fit. Keep a unit in every written value and check any converted value separately. Remeasure a doubtful reading on the garment instead of using an image tool to make the tape look more convincing.

Plan belt product photographs — Photograph a belt with its actual buckle, hole range, strap edge and clear measurement endpoints. Keep scene styling separate from size and leather evidence.

03

Keep styling images outside the measurement record

A generated garment scene can alter the hem, neckline, folds or apparent proportions, so it cannot supply missing measurements. Complete the real overview, label and tape photographs first. If the channel permits another clearly identified role, try one photo-based Fayvoro composition with the garment unobstructed. One uploaded image is the reference for that attempt; Fayvoro does not measure clothes, fit them to a person or construct a dependable size chart.

Review a candidate for changed sleeve length, seams, print placement, damage and closures, comparing it to the exact garment. Do not ask the generator to recreate measurement numerals or tape marks. Keep the real tape frames and written method visible where buyers can find them. If the scene implies a different silhouette or worn condition, reject it and use the actual flat or hanging photograph instead.

Plan apron product photographs — Photograph apron body measurements, actual neck adjustment, waist ties and pocket construction. Keep kitchen styling separate from fit, fabric and protection evidence.

Direction to try

A useful starting note.

Use this as a starting point, then adjust it for your own product. No prompt can guarantee exact product details.

Use my uploaded photograph of this exact resale garment to explore one simple secondary composition, keeping the whole garment unobstructed. Do not change its cut, sleeves, hem, print, closures or visible condition. Do not add a tape, numerical dimensions or a model. I will keep actual garment measurements and label photographs separate and manually compare the candidate.
Before you publish

Check the details.

  • Tagged size is transcribed from this item's actual label.
  • Every dimension has named endpoints, units and a repeatable method.
  • Tape start, end and relevant marks are readable in real photographs.
  • Flat width is not presented as a guaranteed body fit.
  • Any generated scene contains no invented measurement or altered garment construction.
Common questions

A few things to know.

Should I double a photographed chest width?

You can record a separate calculated value if it is useful, but state the method and verify the arithmetic. Keep the actual flat-width reading visible. Do not turn that calculation into a promise that the garment fits a particular body.

What if the label and measured size seem inconsistent?

Keep both facts rather than replacing one. Describe the exact label and your measurement method, and recheck the garment if needed. A standardized marketplace selection does not remove the need for accurate item-specific measurements.

Can Fayvoro add a neat measurement overlay?

This page does not demonstrate an overlay or measurement feature. Create any allowed caption separately from your verified reading, and retain real tape evidence. A generated numeral is not a measurement of the garment.

Make your image
with intention.

Explore a separate scene from your garment photo