All product image guides Leather product and patina photography

Show the leather's present surface, not an imagined finish.

A leather wallet, bag or belt may have variation that buyers want to see. Photograph the actual grain and worn areas consistently, record whether the item is new or used, and distinguish appearance from claims about material or treatment.

Explore one scene from your leather item Two free credits when you sign up. Review the result before publishing.
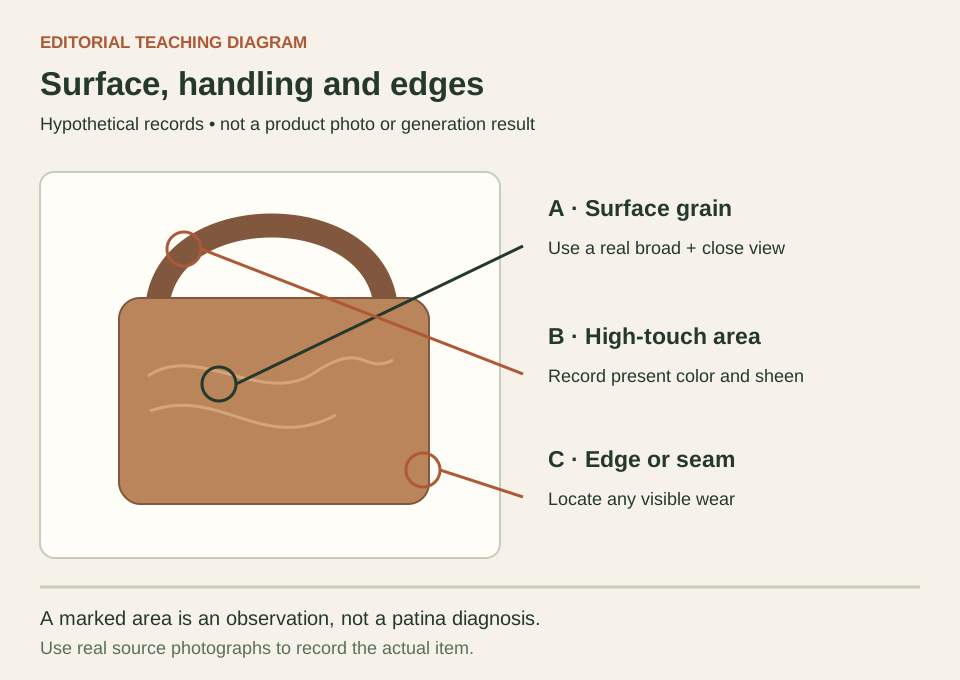
Teaching diagram locating grain, a darkened handle area and an edge-condition close-up on a fictional leather bag
EDITORIAL CONCEPT
01 / EXAMPLEILLUSTRATIVE CONCEPT
What this shows

Inspect different areas without blending their stories.

The diagram marks a broad surface, a frequently handled area and an edge detail. It suggests where to photograph; it does not decide whether a particular mark is harmless patina, a stain, a scratch or damage.

Teaching diagram locating grain, a darkened handle area and an edge-condition close-up on a fictional leather bag
Editorial conceptOriginal teaching diagram, not a product photograph, Fayvoro generation or customer result. Colored patches and lines are schematic observation locations, not real leather photographs or a diagnostic classification.

This image is an editorial concept made for the site. It is not a Fayvoro generation or customer result. AI can change product shape, color, packaging, labels, and text. Check every important detail against the real item.

02 / A PRACTICAL WORKFLOWSTART WITH YOUR PHOTO
01

Record the item and the condition you actually inspected

Start with an item ID, color description, new or used status, and the material information you can support. Separate a supplier's material statement from what you can see in the photo. A visible grain pattern alone does not authenticate a leather grade or manufacturing process. If the buyer receives a particular used bag, photograph that bag instead of substituting a pristine sample from the same product line.

Coach describes patina as changes in sheen and color that develop with handling and wear, and notes that leather finishes differ. Do not convert that general explanation into a diagnosis of every dark patch on your item. Make a plain observation record: location, appearance under the chosen light, any documented treatment, and an unresolved question if necessary. Keep a stain, peeling edge or broken stitch visible rather than calling it character without evidence.

  • Use the same item identity for the overall view and every condition detail.
  • Describe observed marks plainly; do not infer leather grade or restoration history from appearance.

Plan belt product photographs — Photograph a belt with its actual buckle, hole range, strap edge and clear measurement endpoints. Keep scene styling separate from size and leather evidence.

02

Capture surface, bends and edges as distinct views

Make a broad front and back view that shows the current shape and color distribution. Add a closer grain frame, a handle or folded area, and the edge or seam most likely to attract a question. Keep a stable camera position and consistent light for comparisons. If changing the light reveals a mark, retain both the location view and the revealing detail so the buyer can understand where it is.

Choose light that keeps the surface legible without making a shiny area uniformly matte or a dry area look freshly conditioned. Keep color editing consistent across the set and compare the export with the item under your reference light. Record any preparation you performed before the session. This page is a documentation workflow, not a recommendation to apply a treatment; use the maker's instructions for actual material care.

03

Use an atmosphere image only after the facts are covered

After the factual set is complete, try one scene from a rights-cleared photo of the leather item. Ask Fayvoro for a simple setting and gentle light, not a new material or a younger version of the object. One uploaded image supplies the reference for that attempt. The generator does not inspect the leather, classify patina or guarantee preservation of grain, stitch spacing and worn surfaces.

Compare the candidate with the source, particularly high-touch areas, edge paint, creases, zipper teeth and handle attachments. A beautiful output can replace irregular grain with a repeating texture or erase a scuffed corner. Reject it if the product appears materially different. Keep the unchanged original condition views prominent, and describe the scene's concept role wherever the sales channel permits it. Never make generated wear into evidence of age or use.

Direction to try

A useful starting note.

Use this as a starting point, then adjust it for your own product. No prompt can guarantee exact product details.

Use my uploaded photograph of this exact leather item as the reference for one quiet secondary scene on a neutral surface. Keep the body, handles and seams visible with soft side light. Do not recolor, smooth, restore or age the material, and do not add logos or accessories. I will manually compare grain, creases, edge wear and color with the source.
Before you publish

Check the details.

  • New or used status describes the actual photographed item.
  • Grain, handles, bends, seams and edges have factual source views.
  • Dark areas are observed and located without an unsupported patina diagnosis.
  • Color and sheen remain comparable across the exported gallery.
  • A scene candidate does not erase wear or invent material, age or restoration.
Common questions

A few things to know.

Is every dark mark on leather patina?

No conclusion follows from a photograph alone. Record the mark and its location, retain clear detail views, and seek appropriate material knowledge when the distinction matters. A general explanation of patina does not classify an individual stain or damaged edge.

Can I make a used bag look new for the hero?

For a listing of that specific used item, preserve its actual condition. Removing wear changes what the buyer thinks they receive. A separate concept can explore composition, but should not replace the factual product and condition gallery.

Can a generated texture prove that the item is full-grain leather?

No. A generated surface is an image outcome, not a material test. Use supported product documentation for material claims and real photographs for appearance. Fayvoro does not certify leather grade or treatment.

Make your image
with intention.

Explore one scene from your leather item