All product image guides Product photo retouching

Define the repair before changing the pixels.

A useful retouching request identifies the exact defect, the genuine source evidence and the area that may change. Separate a capture problem from a characteristic shoppers should see.

Explore one secondary product scene Two free credits when you sign up. Review the result before publishing.
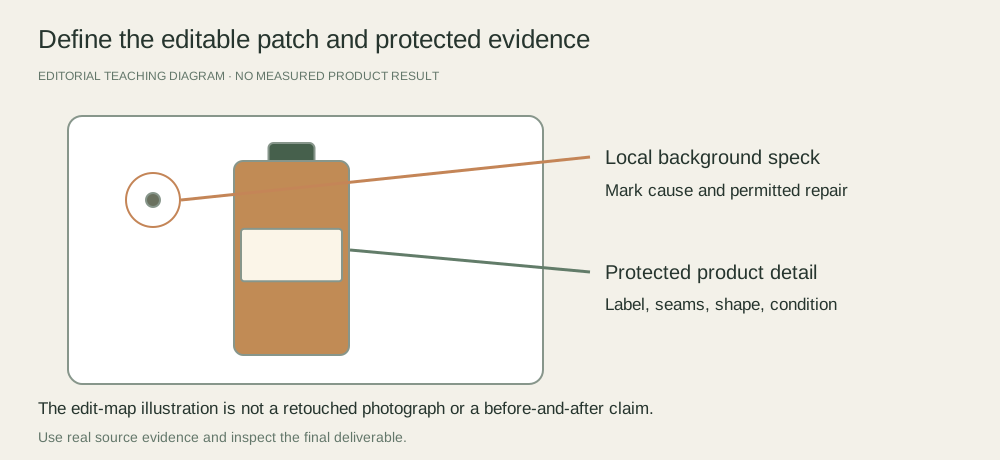
Retouching edit map with a dust spot on the background marked editable and the product label, seams and condition marked protected
EDITORIAL CONCEPT
01 / EXAMPLEILLUSTRATIVE CONCEPT
What this shows

An edit map has boundaries.

This original diagram shows a request format. It is not a retouched photograph or a before-and-after performance example.

Retouching edit map with a dust spot on the background marked editable and the product label, seams and condition marked protected
Editorial conceptOriginal teaching diagram. It is not a generated product image, a customer example, or a measured test result.

This image is an editorial concept made for the site. It is not a Fayvoro generation or customer result. AI can change product shape, color, packaging, labels, and text. Check every important detail against the real item.

02 / A PRACTICAL WORKFLOWSTART WITH YOUR PHOTO
01

Classify the mark you want to remove

Dust on the shooting surface, a temporary support and a camera sensor spot are different from a scratch on a used item or a seam in its construction. Inspect the physical product and describe the cause before selecting a tool. Clean or reposition the item and reshoot when that produces a clearer truthful source with less work.

For resale, handmade and refurbished products, wear or variation may be part of what the buyer receives. Do not remove it merely because the result looks more polished. Resolve the merchandising decision with the product owner and preserve a factual condition view.

Make used-item condition visible — Build an overview and defect map from the actual inventory item.

02

Give the editor a bounded local request

Use an untouched master, a marked preview and a short instruction: location, defect, permitted repair, protected details and reference file. For example, removing a background speck should not reshape the adjacent product outline. Keep the mark-up separate from the source so arrows or circles cannot accidentally enter the final export.

Adobe documents cloning and healing from sampled pixels. Those tools require an appropriate source area and judgment about texture and edges. Sampling another part of the image does not prove that an unseen label, stitching pattern or missing accessory has been reconstructed correctly.

03

Check the repair at its boundary

Review the edited patch beside the master, including the transition around its edge. Look for repeated texture, smearing, inconsistent grain or copied highlight shapes. Confirm that factual lettering, sold quantity and genuine condition remain unchanged. Keep the edited revision and the editor’s note so a later export can be traced back.

Fayvoro generates a new image rather than offering a local clone brush, edit mask or pixel lock. If your task is a tiny factual correction, use a precise editor with source evidence. Use the scene CTA only when a new secondary setting is the appropriate separate job.
Practical decision worksheet

Write a bounded edit request

Use this map to brief an editor; the table does not perform a repair.

Need or findingNext actionEvidence to check
Background dustMark its location and permit a local surface repair.The product outline and background texture are unaffected.
Temporary support visibleSupply a genuine clean source or a documented removal plan.Support removal does not invent hidden construction.
Scratch on the sold itemPreserve accurate condition evidence; ask the owner about presentation.Buyers can still see the condition they will receive.
Unreadable package claimReshoot or supply a verified precise source.No label text is reconstructed from a guess.

Use the worksheet in your existing capture, editing or storefront workflow. Fayvoro’s scene studio is a separate optional step and does not perform the editing or platform actions described here.

Direction to try

A useful starting note.

Use this as a starting point, then adjust it for your own product. No prompt can guarantee exact product details.

Explore a new secondary setting around my reviewed product photo. Do not treat this as a local retouching repair; I will compare the product outline, label and condition against the untouched master before using the scene.
Before you publish

Check the details.

  • Each requested repair identifies a capture defect or an owner-approved adjustment.
  • The source evidence and protected product areas are named.
  • Texture and edges around the patch are inspected.
  • The final revision retains truthful condition and factual detail.
Common questions

A few things to know.

How is this different from the quality-control guide?

This page prepares a specific local edit request before retouching. Quality control evaluates a complete candidate and decides whether to approve or repair it.

Can I erase wear from a second-hand item?

Keep the condition buyers will receive visible and accurate. Confirm the intended presentation with the seller rather than using cosmetic repair to hide condition.

Does Fayvoro have a retouching brush?

The current studio generates scenes from photo references or text. It does not provide a local repair brush, editable mask or guarantee unchanged product pixels.

Make your image
with intention.

Explore one secondary product scene